With an impending trip to the US in a few weeks, even though I have my trusty factory unlocked LG Nexus 4 (as well as my old factory unlocked Samsung Nexus-S) and a lot of other unlocked phones, I decided that it was time to unlock my Blackberry Q10. Since I've used the company MobileinCanada to unlock my cellphones in the past and I found them to be a trustworthy company and they were also fast in providing unlock codes for me in the past, I decided to use them again. There are cheaper online companies that can unlock cellphones but because I've used MobileinCanada in the past, it was my primary reason for using them again.
With the other phones that I've unlocked, MobileinCanada provided me with the unlock code in a few hours. However, with my Blackberry Q10, it took them close to 24 hours to get the code. Because of the longer than normal wait time for me to get the unlock code this time, if you are in a rush to get an unlock code, MobileinCanada might not be a good option for you.
The unlock code is a specific code based on the unique IMEI number of your phone. More information on what an unlocked phone is can be found *HERE* in my blog entry devoted to the topic. Although that blog entry is over a few years old, the information there is still relevant.
Once I received the code, it was a simple matter of entering the unlock code by going into the Settings, Security & Privacy, SIM Card and then scrolling down to the Phone Network Unlock and then clicking on the Unlock Network button. I then had to enter the unique unlock code.
Randomly picking a code or entering the wrong code a few times will permanently lock the phone so I was very careful to enter the correct unlock code in the screen above.
Once my Blackberry Q10 showed up as being unlocked, I tested it by inserting a microSIM from another carrier into it and the Blackberry Q10 was able to acquire the network without any problems. This means that once I go to the US in a few weeks, I will be able to swap my US microSIM card between my LG Nexus-4 and now my Blackberry Q10.
If you have any comments/questions regarding this blog entry, please don't hesitate to leave a comment in the comments section below. Please note that the comments are moderated and any comment containing a URL link (whether embedded or not) will automatically be flagged as spam and will not be posted.
I don't drive my car often and needed a boost a few weeks ago. The same thing happened to me last year as well. I've decided to write a review on a product that I purchased in order to keep my car's battery charged/maintained for the long periods that I don't drive my car.
I decided that it was time for me to get a battery maintainer for my car after going through the hassle of calling the auto club that I'm a member of and waiting for them to boost my car (at a somewhat inconvenient time when I needed to drive off in order to arrive on time for an appointment). I generally park inside an unheated garage and because I work downtown and it is more convenient (and less expensive) for me to take public transportation, it has happened that I didn't drive my car for over 3 weeks. After over 3 weeks of not using my car in the winter where temperatures outside where I live in the winter can stay at or go below -20C or -2F for multiple days/hours, even if my car was parked in an unheated garage, my car's battery was drained and couldn't start my car which required me to call CAA to get my car's battery boosted. I remember this happening when I went on a 2 week vacation in January and left my car in the unheated garage for those 2 weeks and then when I got back, I didn't drive my car for an additional 2 weeks and my car's battery did not have enough juice to start my car.
Rather than drive once a week or every few days when I didn't really need to drive my car just to maintain/charge the battery, getting a battery maintainer was something that I wanted/needed to do. I also didn't like the idea of boosting my battery repeatedly since this is not good for the battery.
I asked some friends for their recommendations and someone recommended that I take a look at the Battery Tender Junior. At the time that he recommended it to me, it was actually on sale along with it's "big brother" the Battery Tender Plus 12V. The Junior was rated at 0.75A and the Plus was rated at 1.25A.
After much consideration, I decided to get the Battery Tender Junior. The product information for the Battery Tender Junior can be found *HERE*.
After purchasing the Battery Tender Junior, I decided to immediately attach it to my car. At first I opted to use the battery alligator clips but then later decided that I would use the battery ring terminal cable because I didn't want to keep the hood of my car open while I was charging/maintaining the battery. Both cable attachments are fused for added security.
The battery alligator clips were very easy to use. Installing it was just as simple as popping up the hood of my car, carefully attaching the positive alligator clip to the positive terminal of the battery and then attaching the negative alligator clip to the negative terminal of the battery (my car has a negative ground). I then attached the alligator clips cable's quick connect to the quick connect of the main battery tender unit. After doing this, I plugged the unit into the AC outlet. The LED immediately turned red to indicate that it was charging the battery.
After approximately 30 minutes in this configuration, I decided that I would attach the battery ring terminal cable to the battery itself. Although I didn't time it, doing this took me approximately 30-45 minutes. I could have probably done it a lot faster if I had the proper tools initially with me. The configuration using the battery ring terminal cables took longer since it took some time for me to remove the nuts and bolt in order to attach the battery ring terminal. The installation document can be found *HERE*. After attaching the battery ring terminal cable to the battery, I attached it to the quick connect of the main battery tender unit and then I plugged the unit into the AC outlet. The LED immediately turned red again to indicate that it was charging.
With the ring battery cables connected, I was able to close the hood of my car which I couldn't do when the alligator clips were used.
Prior to me using the Battery Tender Junior in my car, my car sat idle in the garage for approximately 1.5 weeks. I didn't time the exact amount of time that it took the Battery Tender Junior's LED to change from red to flashing green but when I checked the unit after 24 hours, the LED was still solid red. When I checked the unit after approximately 36 hours, the LED was flashing green. When I finally checked again after 48 hours, the LED was solid green indicating that it was now maintaining the battery (in float mode).
When it came time for me to start my car, I unplugged the Battery Tender Junior from the AC outlet and then removed the unit's quick connect cable from the battery ring terminal cable's quick connect. I started my car and it started up immediately. In fact, my car seemed to start up easier/faster/better than it has every started in the past.
A copy of the product instructions can be found *HERE* and a copy of the troubleshooting guide can be found *HERE*.
According to the documentation, the Battery Tender Junior can be safely connected/plugged into the AC outlet 24/7 and is perfect when storing their car for the winter or for people like me who only drive their car occasionally. Rather than trying to remember when to plug in the device (based on how many days my car was not used), I decided to keep it plugged in whenever I park inside the unheated garage.
I have no problems recommending the Battery Tender Junior for anyone who doesn't drive their car a lot or who wants to store their car for the winter. However, if you're looking for something to quickly charge your car's battery or to boost your car's battery, the Battery Tender Junior is not for you.
If you have any comments/questions regarding this blog entry, please don't hesitate to leave a comment in the comments section below. Please note that the comments are moderated and any comment containing a URL link (whether embedded or not) will automatically be flagged as spam and will not be posted.
A few days ago, I received the prompt on my LG Nexus-4 notification bar informing me that there was an update available for my Nexus-4. When I checked the update, it was for Android 4.4 (KitKat).
This blog entry will be about the update process as well as my early thoughts regarding Android 4.4 (nicknamed KitKat).
After receiving the prompt indicating that there was an update available and that my Nexus-4 had automatically downloaded the update, I decided to install it. Excluding the download time (since this will depend on your internet connection and unfortunately I didn't time this because it happened on my phone in the background), the update process was under 15 minutes. The size of the update as shown in my screen capture is 238.9 MB.
The update process was completely automated and it restarted twice without any user intervention (even though my SIM had the SIM lock activated). Below are some pictures that I took of my actual LG Nexus-4 screen when I was upgrading my Nexus-4 from JellyBean (Android 4.3) to KitKat (Android 4.4).
Prior to the update, the screen of my LG Nexus-4 looked like the screen capture below:
After the update, the screen of my LG Nexus-4 looked like the screen capture below:
In terms of the differences in Android 4.4 on my LG Nexus-4, the most noticeable differences is that the notification bar for the time/battery/wireless went from blue to white. I personally preferred the blue but really is a matter of personal preference.
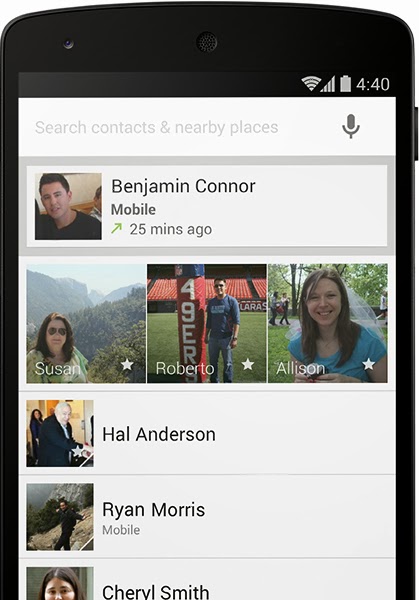
Another noticeable difference is that the phone dialer has changed dramatically. I haven't included a screen capture of it since it shows some of my contacts on it but I have included an image below that I found on the internet from Google's promotional webpage on the features of KitKat. The tab to switch from the dialer and history selection are now at the bottom of the phone screen on KitKit as opposed to being on the top of the screen as it was with earlier versions of Android.
The caller ID on KitKat is supposed to be "smarter" in that it will get the names of businesses that aren't on the phone's contact list and display it on the phone (if the business is calling you) provided that the business has a listing on Google Maps. There is also a setting that enables it to display your name from your Google account in the event that you call someone and your name is not listed in their phone's contact list if they are using an Android 4.4 phone. I rarely get called by businesses on my phone so I haven't really experienced the "smarter" caller ID which is offered by KitKat yet.
In terms of the SMS feature and it being integrated with Google Hangouts, on my LG Nexus-4, I didn't incorporate that feature when I upgraded my Google Hangouts. When I checked my SMS messages, they appeared in the same way as they did previously (prior to my upgrade).
I've been using Android 4.4 only about 3 days at the time of this blog entry and the battery life seems to not be as good as it was prior to me upgrading it. I won't say that it is bad but it definitely seems to not be as good as it was prior to my upgrade.
One other thing that I would like to mention because I use it is that Android 4.4 includes the ability to print photos, documents, and webpages to any Google Cloud enabled printer or HP ePrint enabled printer. Previously, I was using HP's own HP ePrint application for Android. Having this built into the OS of the phone opens up new possibilities for printing.
For a list of the features of KitKat, you can refer to *THIS* webpage. Please note that some of the information on the webpage is specific to Android 4.4 (KitKat) on the LG Nexus-5.
If you have any comments/questions regarding this blog entry, please don't hesitate to leave a comment in the comments section below. Please note that the comments are moderated and any comment containing a URL link (whether embedded or not) will automatically be flagged as spam and will not be posted.
I've been using my unlocked Linksys Internet phone adapter PAP2T for about a year now with my SIP service provider and I thought that I would write my thoughts on it.
Configuring the device was fairly simple. It involved connecting the device to my router and the power supply as well as connecting an analogue telephone to the PAP2 Line 1 port. After waiting approximately 60 seconds, you would pick up the phone receiver and then hit the "*" key on the phone 4 times. You will then hear a message about the configuration menu. Press "110#" and the system will then reply with the IP address for the device.
Using your web browser connected to the same network as the newly plugged in Linksys Internet Phone Adapter, you basically only have to plug in the IP address into the browser's address bar and it will go into the configuration screen for the device.
Depending on your SIP provider, you will have to make the changes in the configuration screen for the Linksys Internet Phone Adapter.
I use VoIP.ms and I found the configuring the Linksys Internet Phone Adapter for VoIP.ms to be pretty straightforward (comparable with configuring SIP clients on my smartphone). Yes, the Linksys Internet Phone adapter has a lot more parameters than the standard SIP client on a smartphone but all I did was configure the parameters that were required.
VoIP.ms actually has a configuration document specifically for the Linksys Internet Phone Adapter PAP2T. I created a PDF (printed to PDF) from the wiki created by VoIP.ms.
I configured each telephone RJ-11 port to work with a different account with different phone numbers.
In terms of the quality of service, like with all VoIP solutions, the sound quality will depend a lot on the speed/bandwidth/latency of the internet connection that it is plugged into. I would say that the sound quality is better than what I am getting with my SIP client on my cellphone configured to use the same wireless router/network because the Linksys Internet Phone Adapter uses a network cable and doesn't connect to a wireless network which is generally less stable than a wired connection. The Linksys Internet Phone Adapter also had the added benefit of using a real phone which I find has better sound quality than most cellphones.
If you are subscribed to a SIP provider, I have no problems recommending the Linksys Internet Phone Adapter (as long as you purchase it unlocked since some Linksys Internet Phone Adapters are locked to a particular SIP provider or SIP carrier). It works very well and set-up is relatively simple.
If you have any comments/questions regarding this blog entry, please don't hesitate to leave a comment in the comments section below. Please note that the comments are moderated and any comment containing a URL link (whether embedded or not) will automatically be flagged as spam and will not be posted.
I've been using Blackberry Messenger (BBM) for Android for approximately 2 weeks along with using it on my Blackberry Q10 and I've decided to write my thoughts about the version that is currently available for Android (v1.0.0.72) as well as for iOS (v1.0.3.120)
You can download BBM for Android on the Google Play Store *HERE* and you can download BBM for your iPhone/iPad from iTunes *HERE*.
I've tried BBM for Android on my LG Nexus-4 as well as my Samsung Nexus-S. When I first downloaded the program when it was first released, because Blackberry wanted to control the number of users and make sure that nothing went wrong with too many users, there was a sign-up period which for me lasted a few days. However, as of the date of this blog entry, there is no waiting period in order to register/activate the program and get a Blackberry PIN.
The thing with BBM is that it uses a unique code/ID called a Blackberry PIN in order to add people into your Blackberry Messenger (BBM) contact list. You generally must know the person's Blackberry PIN in order to add/invite the person into your BBM contact list. The benefit of this method is that it requires approval from the person you are trying to add before you can chat with the person. Someone can't simply add you into their BBM contact list by knowing your phone number or your e-mail address. The drawback to this method (when compared with WhatsApp) is that there isn't a simple way of finding your friends who are using BBM when you are using the Android version of BBM.
With WhatsApp, the program will match the phone numbers in your phone's contact/addressbook and it will display all the people in your phone's addressbook who installed WhatsApp. The negative part of WhatsApp is that it goes through your phone's contact list for people who've installed WhatsApp and you might have someone in your phone's address book but you don't necessarily want to have them show up in your chatting program nor do you want your name to appear in their chatting program just because they have your phone number in their phone's addressbook.
On my Blackberry Q10, finding people who are using BBM is a bit easier but still requires the approval process. When I go into the BBM Menu on my Blackberry Q10, and then click on "Invites", there is a tab where I can see "Suggested" invites. I'm not sure how Blackberry does this but I believe that on Blackberries, it compares the people currently in your Blackberry Contact list and it will use this based on the e-mail address that someone used to activate BBM on their device. If BBM on Blackberry 10 detects a match, it will list the contact in the "Suggested" tab. Even if you add someone using BBM for Blackberry 10, the person must approve you before you are able to chat with him/her. On the current Android version of BBM, the "Suggested" tab is not there nor is the "Suggested" tab on the current iOS version of BBM.
During my tests with BBM on Android as well as on iOS (I tested it more on Android than on iOS), I found that sometimes the message would be delivered to my non-Blackberry phone while other times it wouldn't be delivered (the sender would see the check mark corresponding with the message having been sent but not delivered to the recipient's phone yet). I sent the message from my Blackberry Q10 to my Android phone as well as my iPhone 3GS and noticed that sometimes for some strange reason, there was no notification that a BBM message was sent to my non-Blackberry phone. When using my Blackberry Q10 to communicate/BBM with another Blackberry device, the messages were consistently received without any issues.
The Android and iOS version still requires a bit of work in order to make sure that messages are sent/received properly and instantaneously on non-Blackberry devices and I would like to see additional features such as the ability to talk or videochat between different platforms. The Blackberry version of BBM has more features than the current Android and iOS versions of BBM but hopefully Blackberry will include the features that Blackberry users are used to on the other platforms as well as improve the reliability of sending/receiving notifications of BBM messages waiting.
If you have any comments/questions regarding this blog entry, please don't hesitate to leave a comment in the comments section below. Please note that the comments are moderated and any comment containing a URL link (whether embedded or not) will automatically be flagged as spam and will not be posted.
Blackberry released v10.2 for their Blackberry 10 phones recently and I decided to update my Blackberry Q10 a few days ago with their v10.2.0.424.
The size of the update was ~465MB. I didn't time the update but I did check it at the 1 hour mark and again at the 1 hour & 30 minute mark and my Blackberry Q10 was finished applying the update after 1 hour & 30 minutes and I received a message to reboot my phone.
During the installing/updating my Blackberry Q10 to v10.2, I kept my Blackberry Q10 connected to a power source (which I believe is a requirement for the upgrade to work). I didn't try it but if the installation/updating works without it being plugged into a power source, I wouldn't recommend it since if the Blackberry were to run out of power mid-install/upgrade, your Blackberry might no longer boot up.
The version of the OS that I had previously was Software Release 10.1.0.4181 (OS Version 10.1.0.4633).
The update process was a 2-step non-user prompted process (if you exclude the reboot step). The first step as shown by the snapshot below was the downloading process. The download connection speed that I was using during the upgrade process was ~2 Mbits/second.
After the update finished downloading, it automatically installed it without any user intervention.
As mentioned, I didn't exactly time the process but checked my phone twice during the upgrade process and after 1 hour & 30 minutes, I received a message prompting me to reboot my phone. I rebooted my phone and it seemed to take longer to boot up than normally (although I didn't time it, I would say that it took maybe about 5 minutes). After the reboot process, there was a message on the phone that said "Preparing Blackberry Hub"
After ~1 minute of "Preparing Blackberry Hub", I was able to access the phone again and I obtained the screenshot below.
I then verified the version of Blackberry OS I had after the upgrade and I obtained the screenshot below:
If you have any comments/questions regarding this blog entry, please don't hesitate to leave a comment in the comments section below. Please note that the comments are moderated and any comment containing a URL link (whether embedded or not) will automatically be flagged as spam and will not be posted.
Well, after a mishap, Blackberry finally released BBM on both the iOS platform (iPhone, iPad, & iPad mini) as well as Android.
You can download the iOS version from iTunes *HERE*. You can download the Android version from the Google Playstore *HERE*.
I downloaded it and I'm looking forward to trying it on both platforms. I had managed to sign up for it on BBM.com so I don't have to wait to use it.
The information from Blackberry's official blog regarding the release is *HERE*. I have copied the blog entry into my blog just in case it gets deleted or is modified from their blog.
This is the news you’ve been waiting for! I am thrilled to tell you that we are about to officially resume our rollout of BBM for Android and iPhone customers around the globe!* In the next few hours, people will start seeing BBM in Google Play, the App Store and in select Samsung App Stores – where it will be free to download. The demand for BBM on Android and BBM on iPhone continues to be amazing. About six million people signed up for information about BBM at BBM.com. As you know, in just seven hours, about one million Android users were using the unreleased version of BBM for Android. What you don’t know is that more than one million people have found creative ways to “side load” BBM on their iPhone. This is incredible. To help manage this unprecedented pent up demand for BBM, we are implementing a simple line-up system to ensure a smooth roll out. Here’s how it is going to work… BBM Roll Out Details: Download BBM – the easiest way is to visit BBM.com from your Android or iPhone browser* Once you install the app, open it, and enter your email address to hold your spot in line We will email you as soon as you reach the front of the line and can start using BBM If you are among the millions that took the time to sign up at BBM.com, you can start using BBM immediately without waiting in line.* If you didn’t sign up in advance, don’t worry – we are focused on moving millions of customers through the line as fast as possible. Our team of developers and engineers has been working around the clock to bring you BBM – and make some upgrades while we’re at it – and some incredible work has been done. I look forward to sharing more of this with you here, on Inside BlackBerry, soon. For updates on how quickly the line is moving you can follow @BBM on Twitter. I will be back tomorrow with another post to provide you with an update on the line-up and to share more detail about the work the team has done over the last several weeks. Lastly, thank you for your patience. We know you’re excited (we are too!) and we look forward to having you join us on BBM. *Samsung customers in Sub-Sahara Africa can download BBM today from the Samsung Apps store. iPhone and other Android users in Africa will be able to download the app in three days’ time.
The website for both products can be found *HERE*.
If you have any comments/questions regarding this blog entry, please don't hesitate to leave a comment in the comments section below. Please note that the comments are moderated and any comment containing a URL link (whether embedded or not) will automatically be flagged as spam and will not be posted.
I don't use my Blackberry Playbook on a daily or even on a weekly basis since with all the electronic gadgets that I have which are capable of browsing the internet and reading e-mail messages, I will only generally use my Playbook only when the battery is low on my other tablets. When I turned on my Blackberry Playbook a few days ago, I received a notification that there was an update to perform.
The update was 2.1.1753 and was listed as being 397 MB in size. Previously, my Blackberry Playbook was running 2.1.0.1526.
I didn't monitor the download entirely since it was a 2 or 3 step process depending on your viewpoint (downloading and then installing and of course a reboot). During the updating process, the message on the Playbook mentions that it should be plugged in. Even though the battery power on my Playbook was full, I didn't try to see whether it will work unplugged.
Since the first part of the process requires downloading the 397 MB update. For me the entire update process was close to 1 hour. As mentioned, I did not monitor the entire process but at the 1 hour mark, I checked the Playbook screen and it displayed a message indicating that a reboot/restart was necessary.
I clicked on the reboot/restart and after the standard boot-up time, I went back into my Playbook and tried out a few of the applications to see if I could notice any differences.
I didn't notice any differences. I checked Facebook and just like previously, the profile pictures for the news feeds don't appear.
At the same time, I looked at my Acer tablet and there was also an update listed for it as well. I will apply this update at a later date but will definitely apply it since I believe in keeping all software and tablet/phone OSes updated whenever possible.
If you have any comments/questions regarding this blog entry, please don't hesitate to leave a comment in the comments section below. Please note that the comments are moderated and any comment containing a URL link (whether embedded or not) will automatically be flagged as spam and will not be posted.
I got the opportunity to try out the ZTE WF720 Wireless Home Phone Device and thought that I would write a review of the product.
This device is offered by certain cellphone/wireless carriers such as AT&T Wireless (in the US) and Rogers/Fido (in Canada). The monthly price varies but since I live in Canada, the version that I got to try was from Fido. Rogers has the exact same deal. The monthly charge for both Rogers and Fido is either $9.99 per month or $24.99 per month plus the applicable monthly taxes/fees. The $9.99 monthly price tag is to anyone with an existing service with the carrier and gives unlimited nationwide calling (no long distance fees). The $24.99 monthly price gives the same service except it is for people who don't have any services with the carrier. I'm not sure what the fee is for AT&T's wireless home phone service.
The way that the device works is that you insert the SIM card into the device (the device uses a normal mini-SIM), connect the battery to the device, and plug it into an electrical outlet. You then connect your household phone's RJ-11 cable to the device and start making/receiving your calls. According to the documentation, the battery will last for ~3 hours if not plugged into the AC outlet. I haven't tested the battery myself but based on my experience with advertised battery usage times, I would probably say divide that number in half. However, since it is meant to be a home phone, it should always be plugged into the AC outlet.
The unit has 2 RJ-11 phone ports, a power on/off button, the power cable input port and what the manual labels as a service port. In terms of LEDs, the ZTE WF720 Wireless Home Phone Device has 4 indicator lights (power, voicemail, battery, & signal strength). Each RJ-11 phone port is simply an extension of the phone number so you can plug 2 different phones to each phone phone (ex: one cordless and one corded) and use either phone to make a call and pick up either phone (or both phones) when a call is received.
Since the plan that I tested came with unlimited nationwide calling at a very low price compared to regular cellular service, I tried the SIM in a regular cellphone to see what would happen and the phone would not lock onto the network with that SIM card but would lock onto the same network with a different SIM card from that same carrier.
Another reason that I put the SIM card into a regular cellphone was that I wanted to set up the SIM lock on the SIM card which is not possible to do using the ZTE WF720 Wireless Phone Device itself. After setting up the SIM lock on the SIM card, I inserted the SIM card back into the ZTE WF720 Wireless Phone Device and the phone that was connected to the device seemed to get a regular dial tone but calls could not be made from the phone. The only indication that the SIM lock was in effect was the flashing green battery indicator LED on the unit itself. After entering my SIM unlock code using the connected phone and pressing the # key, I could then make a phone call (and receive phone calls).
Although the device looks like it is a VoIP solution, it is in fact using the carrier's phone service in order to make and receive calls. I find the signal strength of the device to be good and the voice quality to be better than what I would get in the same location with my cellphone.
One thing that I wanted to write was that the device mentions that it will not work with satellite receivers, modems, fax machines, and home alarm system. I have not tested the device in any of the above items to see whether it will work or not.
For Canadians, depending on your needs and usage, I have no problem recommending this device with the price plan price of $10+taxes per month. The $25+taxes per month price tag might still be worthwhile depending on how much you pay for your home phone service and what you use your home phone service for.
In terms of the sound quality, I would say that that sound quality is equivalent to what you would get on a cellphone at the same location (or maybe slightly better). For me, even though I am using a regular landline phone connected to this device, I can still tell that you are not using a real landline since the sound quality is not as good as what I get with a real landline because sometimes the person's voice whom I'm talking with will sound a bit "robotic" and other times I will lose certain syllables/words during the conversation similar to what I would get with a handheld cellphone.
One of the good things about this device over a regular landline phone service is that it is easily transportable and since the plan covers unlimited nationwide calling as long as the device is within the carrier's cellular coverage area, it makes a good phone to take with you if you go to another part of the country temporarily.
What makes this device extremely attractive is that unlike in the US, in Canada, most cellphone plans don't include nationwide calling. What this means is that if someone with a Montreal area code goes to Toronto and receives a call on his Montreal cellphone, he/she will pay long distance to receive the call. If he/she makes a call back to Montreal while in Toronto (even though his phone has a Montreal area code), he/she will pay long distance to make the call. Using this device, all of this is ignored since while in Canada, you can receive a call without paying anything extra and you make a call to a Canadian number without paying anything extra.
For a copy of the ZTE WF720 Wireless Home Phone device manual, you can click *HERE*.
If you have any questions/comments regarding this blog entry, please don't hesitate to leave a comment in the comments section below. Please note that the comments are moderated and any comment which contains a URL link (whether it is embedded or not) will automatically be labelled as spam and will not be posted.
In this week's blog entry, I was going to write about BBM being available for the iPhone and Android. The date that was stated on Blackberry's blog posting indicated that the Android version of BBM would be available at the Google Play Store on Saturday September 21 whereas the iOS/Apple version of BBM would be available on the Apps Store on Sunday September 22. You can find this mentioned on Blackberry's official blog *HERE*.
Looking at Blackberry's blog entry for today (September 23, 2013), it looks as if it will probably be awhile for BBM to be widely available for Android and iPhone.
Hi Android and iPhone users, This is Andrew Bocking, head of BBM at BlackBerry. As a follow up to our first blog post on Saturday, I want to take a moment to provide you with an update on the rollout of BBM on Android and iPhone.Last week, an unreleased, older version of the BBM for Android app was posted on numerous file sharing sites. We were aware of an issue with this unreleased version of the BBM for Android app. This older version resulted in volumes of data traffic orders of magnitude higher than normal for each active user and impacted the system in abnormal ways. The version we were planning to release on Saturday addressed these issues, however we could not block users of the unreleased version if we went ahead with the launch. We attempted to address the problems caused by the unreleased version throughout the day on Saturday, but as active users of the unreleased app neared a million – and accelerated – it became clear that the only way to address the issue was to pause the rollout for both Android and iPhone. The team is now focused on adjusting the system to completely block this unreleased version of the Android app when we go live with the official BBM for Android app. We are also making sure that the system is reinforced to handle this kind of scenario in the future. While this may sound like a simple task – it’s not. This will take some time and I do not anticipate launching this week. Thank you for your patience while we take the time needed to deliver the experience you expect from BBM. We will continue to provide you with updates here on InsideBlackBerry.com and through @BBM on Twitter. We will notify everyone who has pre-registered on BBM.com when BBM is available on Android and iPhone. Andrew Bocking EVP, BBM
With all the bad news coming from Blackberry these days, I'm hoping that they actually release BBM for Android and for the iPhone and they don't break their promise similar to what they did when they promised to release BB 10 for the Playbook but then later mentioned that because BB 10 wouldn't run optimally on the Playbook, the decided not to move forward with this project.
For me, even though I have a Blackberry Q10 that has BBM on it, I'm eagerly awaiting (and hoping) that they release BBM for the iPhone and Android platform but based on their past performance, I'm not sure if it will happen anytime soon (if ever).
If you have any comments/questions regarding this blog entry, please don't hesitate to leave a comment in the comments section below. Please note that the comments are moderated and any comment containing a URL link (whether embedded or not) will automatically be flagged as spam and will not be posted.
Since my previous blog entry was regarding Google's new Android Device Manager option, I thought that I would write about Blackberry's equivalent program/option called Blackberry Protect.
There is an application called Blackberry Protect for pre-Blackberry 10 devices while for Blackberry 10 devices, Blackberry Protect is built into the operating system. When the Blackberry that I was using was my Blackberry Bold 9700, I used the Blackberry Protect program which I downloaded from the Blackberry App World.
The version of Blackberry Protect available for pre-Blackberry 10 devices does more than the built-in Blackberry Protect available for Blackberry 10 devices. The pre-Blackberry 10 version allows for backing up and restoring of certain data whereas the Blackberry 10 device only allows for a one type restore of existing pre-Blackberry 10 data onto the Blackberry 10 device. In this blog entry, since Blackberry Protect is part of the Blackberry 10 OS, the version of Blackberry Protect that I'm referring to is the one included with Blackberry Software Release 10.1.0.4181 / Blackberry OS Version 10.1.0.4633.
Blackberry Protect does what I wrote in my blog the last time about Android Device Manager and that is that it allows you to get a rough approximation of the device location and it also allows you to ring the device remotely. In order to do both of these features, the Blackberry 10 device must have data enabled.
Unlike with the current features of Android Device Manager where it can only do three things (give a rough approximation of the location, play sound, and wipe the device remotely), Blackberry Protect for Blackberry 10 devices also allows you to display a message on the Blackberry 10 device and it also allows you to instantly lock the device as well as display a message on the device before locking it instantaneously.
The "My Data" tab on the Blackberry Protect webpage doesn't do anything on Blackberry 10 devices whereas on pre-Blackberry 10 devices it will show you the last few backups which were done on your pre-Blackberry 10 device.
I have included a screen capture of what the "My Data" tab shows for my Blackberry Bold 9700 below.
If you have any comments/questions regarding this blog entry, please don't hesitate to leave a comment in the comments section below. Please note that the comments are moderated and any comment containing a URL link (whether embedded or not) will automatically be flagged as spam and will not be posted.
Google recently introduced/incorporated an Android Device Manager on their Android devices. It is a fairly simplified application/setting which allows users the ability to locate their Android device(s) as well as protecting your personal information by offering users the ability to wipe the device remotely. Both of these features require that your device either be connected to a WiFi access point or for your device to have an active data connection/plan. Google made an announcement regarding this new feature on the following blog entry *HERE*.
To activate it on your Android device, you would click on the Google Settings Icon and then click on Android Device Manager. You must configure this on each of your Android devices since the setting is specific to the device itself. After doing this, you will then turn on the "Remotely location this device" and/or "Allow remote factory reset" depending on what you want to activate.
In order for the location to work, the phone must have data enabled or be connected to the wireless network. After you've activated Android Device Manager on your Android device, in order to test it or use it, what you will have to do is log onto your Google account and go to the following website: https://www.google.com/android/devicemanager
From the website, users can get an approximate location of where their Android device is as well as cause it to ring. The ring can be deactivated on the device itself by pushing the on/off button on your Android device so this feature is used mainly to find your device if you are in close proximity to it. For example, if you've misplaced your phone at home (or at work), instead of calling your phone (where your phone might be muted), you can log onto the above website on a computer and force your phone to ring. This will automatically unmute your phone, raise the volume to the maximum, and sound an alarm/ring. From the sound, depending on your proximity to your Android device, you should be able to locate your it. Left undisturbed, your phone or Android device will ring for approximately 5 minutes. As mentioned above, anyone can turn off the alarm by pushing the on/off button on your device.
During my testing, I have found that the Android Device Manager is sometimes problematic and sometimes it will work while other times it won't work. This is for both the ringing of the device and the locating of the device feature.
I have not tried using the "Erase Device" feature mainly because I didn't want the hassle of re-installing all my applications and re-configuring the device again. You can scroll through the Android devices which have been installed using your Google account.
The Android Device Manager website also allows users to rename their device in case they want to change the name that Google automatically used to identify the device. In the above screenshot, I renamed the name that Google gave for the Android installation on my HP Touchpad to "HP Touchpad" from the default name which I believe was a shortened form of Cyanogenmod with the version number.
Android Device Manager offers basic features for locating and protecting your Android device. Hopefully, Google adds more features to this. Even though Android Device Manager currently only offers basic features, I do find that the features are very good and have no issues recommending people to activate it on their Android device(s). It probably won't stop a thief from stealing your Android device but it might help you find your device from a thief depending on how fast you act and whether the thief has had a change to circumvent the Android Device Manager features. Since the features rely on an active data connection or your device being connected to a WiFi access point, a thief could easily circumvent the features by either turning off data or putting your Android device into Airplane Mode.
If you have any comments/questions regarding this blog entry, please don't hesitate to leave a comment in the comments section below. Please note that the comments are moderated and any comment containing a URL link (whether embedded or not) will automatically be flagged as spam and will not be posted.
Since my Samsung Nexus-S was having issues updating existing programs that I installed onto it and I was mainly using my LG Nexus-4, I decided to root my Samsung Nexus-S after I purchased a replacement battery for it (because the original battery that I had would not last more than half a day based on very light usage). Another reason why I finally decide to re-root my Samsung Nexus-S was because there hasn't been an upgrade to OS for the Nexus-S in a long time (nor do I expect an upgrade to the OS). I had rooted it in the past but when I upgraded the OS software, it reverted to a non-rooted state and because I was only using two applications that required root access, I opted not to root it until recently. Every time the OS is officially upgraded, one of the steps involved in rooting the phone generally wipes the phone back to factory defaults. I found this to be time consuming (reconfiguring the phone and reinstalling all the applications that I had) and not worth it for the 2 applications that I use which require root access. Since there hasn't been an OS update for the Samsung Nexus-S in a long time and I recently replaced my Nexus-S battery, I felt now was a perfect time to root my Nexus-S again.
I did some research on rooting my Samsung Nexus-S and came across this video on YouTube showing how to root the Nexus-S. You can view the YouTube video below or by clicking *HERE* (I did not create this video). A shoutout goes to QBKing77 for creating this video and providing instructions/steps and shoutout also goes to the creator of the program WugFresh.
My instructions are based on the above video and things that I noticed when I tried to root my Samsung Nexus-S. Just like with my blog post on installing Android on the HP TouchPad, I am including my standard disclaimer.
My instructions are geared towards people who are somewhat familiar with computers and know how to troubleshoot simple installation issues or go into certain directories using the command prompt. Regardless of whether you are or aren't such a person, I am including the usual disclaimer that I am not responsible for anything that might go wrong when you follow my instructions or use my files. These instructions and files worked for me and they should work for you.
The instructions that I followed from the YouTube video mention downloading a file. I've included this file on my blog which you can download directly *HERE*. After watching the video to its entirety, download the file either from the site mentioned on the video (or in the description area of the video) or you can download it from the link on my blog.
Please note that everything will be wiped from your phone when you root your device (during the unlock process).
I won't detail everything that the video goes through but will write about some of the issues that I had.
The first issue was that I wasn't sure which version of the Nexus-S I had. In my case, I purchased my Nexus-S from a Canadian carrier called Fido which uses the same frequency/bands as Rogers Wireless in Canada and AT&T in the US. After doing some research (since I could not locate this information on my phone), the Samsung Nexus-S version that I had from the menu selection was the 850MHz i9020a version (which might be the information shown in Settings -> About Phone -> Baseband version).
In terms of which version of Android I was using, I got this information from Settings -> About Phone -> Android version.
From the program screen, I clicked on the "Full Driver Installation Guide" button and followed the instructions. During step 2 of the driver installation, I was presented with the screen/window below:
The recommended solution based on my set-up was Driver Solution #1 based on the screen. However, I tried using the recommended solution a few times (rebooting my computer multiple times and uninstalling/reinstalling the drivers) and the step would always fail during the the Fastboot Check (the ADB check worked without any issues). I decided to try using Driver Solution #2 and after rebooting my computer, both the ADB check and the Fastbook check worked without any issues.
I then proceeded to unlock the bootloader and didn't run into any issues.
When rooting my device using the "Root" button, at first I didn't select the "Custom Recovery" option but after running into a minor issue during boot-up, I redid the step using the Custom Recovery option. After completing all the steps when I clicked on the "Root" button, it didn't add "Superuser" or "SU" to my Samsung Nexus-S.
The video makes mention to the possibility of this happening. To fix this, you will need to download the SU application. I have a copy of it *HERE*. After downloading this ZIP file, you will place it on the root directory of your Samsung Nexus-S (which will probably place it into the /sdcard directory).
After doing this, you will remove your Samsung Nexus-S from your computer and turn off your Samsung Nexus-S, wait a few seconds and then on your Nexus-S push the power button and volume up button at the same time to get into the Boatloader screen. Use the volume key to select "Recovery Mode" which will bring you to the Team Win Recovery screen. Select "Install" and then locate the "CWM-SuperSU-v0.99.zip" program. CWM-SuperSU-v0,.99.zip will install. This is also shown in the video but I thought that I would make mention of it because it did apply in my situation.
If you have any comments/questions regarding this blog entry, please don't hesitate to leave a comment in the comments section below. Please note that the comments are moderated and any comment containing a URL link (whether embedded or not) will automatically be flagged as spam and will not be posted.
Since I wrote about the update to my LG Nexus-4 last week and this week there was also an update for my Blackberry Q10, I thought that I would write about it.
The update was ~150 MB in size. I didn't note down how long it took to apply this update since I started the update and then watched television but I would say that it is not as fast was the update process on the LG Nexus-4.
Before the update, from the Settings menu on my Q10, in the About menu with the Category OS screen being: Software Release 10.1.0.273 & OS Version: 10.1.0.1720, I applied the update. After the update, on the same screen, the values were: Software Release 10.1.0.4181 & OS Version 10.1.0.4633.
The update and some of the improvements are shown on Blackberry's official blog *HERE*.
Some people reported that after applying the update, the lost their SMS messages. For me, I didn't experience any issues with the upgrade except for the following:
1) When my Blackberry Q10 rebooted, I was prompted to re-enter my Gmail accounts. My Gmail account is set for 2-step authentication/verification and because I didn't have the application password with me that I had used, I decided to try using my main password. To my pleasant surprise, after entering my main password, I was prompted for the passcode generated from my phone's Google Authenticator program. After entering the passcode generated from Google Authenticator, my Blackberry Q10, I received a screen informing me that my Blackberry Q10 was now configured to access my primary Google account.
2) I use an instant messaging application called WhatsApp on my Blackberry Q10 and after the upgrade, all the names vanished from my WhatsApp contacts. The only thing that I could see was the picture of the contact from WhatsApp which main sending a message to a particular person very difficult unless I recognized the picture that they used. However, after ~2 days, the WhatsApp application returned back to normal where the names appeared on my WhatsApp application again.
The Google contacts seems to synchronize a lot better than previously where it seemed to be doing it randomly. I updated information regarding one of the contacts that I saved on my computer and probably within 30 minutes (this is what it is set to on my Blackberry Q10), this information was on my Q10.
The only other noticeable change after the update is the Blackberry calender instead of being black is now white. Personally this doesn't bother me as I didn't have a preference to either colour for the calendar but some people might prefer the black calendar background. I also noticed that e-mail on the Blackberry Q10 can now be configured based on an unlimited time period instead of the previous maximum of 30 days.
Since I only applied the update about 2 days ago, I didn't have a lot of chance to experiment/test everything but for me, I haven't noticed any degradation in terms of speed or battery life
If you have any comments/questions regarding this blog entry, please don't hesitate to leave a comment in the comments section below. Please note that the comments are moderated and any comment containing a URL link (whether embedded or not) will automatically be flagged as spam and will not be posted.
Today I received a prompt on my LG Nexus-4 regarding a system update being available today. I checked the version available and it was 4.3.
The upgrade size was 169.3 MB which my LG Nexus-4 already downloaded in the background when I received the prompt on the notification area informing me of the upgrade. Excluding the time required to download the upgrade, it only took under 10 minutes in order to upgrade my LG Nexus-4.
Since I only upgraded it to Android 4.3 about 8 hours ago, I didn't have a lot of chance to experiment/test it but so far I don't really notice any major improvements nor do I notice any degradation in speed and responsiveness.
If you have any comments/questions regarding this blog entry, please don't hesitate to leave a comment in the comments section below. Please note that the comments are moderated and any comment containing a URL link (whether embedded or not) will automatically be flagged as spam and will not be posted.
I have a VoIP SIP phone at home that automatically forwards to my cellphone when I'm not home and occasionally I get telemarketing calls so I looked for a way to block them so I wouldn't be disturbed. I found a way to block the calls on some of my cellphones using third party applications. However, when I'm at home, having my VoIP/SIP phone ring when I knew that the number was a telemarketing call or one of those credit card scam calls promising lower interest or cruise winning scam calls was starting to bother me.
I did some research and came across the Pro Call Blocker version 2.0 at a decent price online. I received it recently and easily set this up and did some testing with it and my cellphone and it worked. What happens is that when the call display shows a number that you've configured to block, it will pick up the phone and then hang up within one second. Depending on where you connect the device to (and whether it is connected in series or in parallel to the phone), the phones on the line might ring once or at most twice for calls on the blocked list. A workaround for this involves turning the ringers off all phones in the house and plugging a phone directly into the device (where the ringer for this phone is on) and only this phone will ring provided that the telephone company sends the caller ID information prior to or during the first ring. Using this set-up, if the caller is in the blocked list, this phone won't ring and since all the other phones in the house have their ringers off in this configuration, it will be as if no one actually called.
With my set-up, the display seemed to freeze occasionally requiring that I unplug the device, wait a few seconds, and then plug it back in. According to the manual, the reason for this is because I am using a VoIP SIP phone and the fix for this is to install an ADSL/DSL line filter. I installed the filter and the display on my device still freezes up so an ADSL/DSL line filter may or may not fix your frozen screen problem if you experience it. Unplugging the device, waiting a few seconds for the device to power itself off, and plugging it in again generally unfreezes the device but you will then have to reconfigure the year on the device if you want the device to accurately show you the day of the week that the call was received. It isn't necessary to reconfigure the date/time because the device will get the date/time from the first incoming call (except for the year). Because I have to unplug my device every few days, I've left the year at the default value of 2012 and I ignore the display portion showing the day of the week that the call was received (I only concentrate on the date and time the call was received which is accurate).
The device gets its power from the phone line which is a good thing and a bad thing. The good thing is that you don't require any batteries even though there appears to be what used to be a battery compartment at the bottom of the device which has been modified to not accept any batteries. The bad thing is if you are using a VoIP solution instead of a regular landline phone, in case of power failure the device will power off and you will have to reconfigure the year/date. On a regular Bell landline, this isn't a problem since power failures don't normally affect regular phone landlines so the device will almost always get power unless there is a major phone outage.
The device also allows users to block outgoing calls but I haven't tried this I don't really need this feature.
The device is programmed by plugging in a phone to the phone jack on the device. You can manually enter numbers that you want to block, manually enter area codes of numbers that you want to block, block all blocked/private calls, or block outgoing calls. The configuration instructions/manual can be found *HERE*.
For me, since my VoIP SIP provider doesn't allow me to block specific incoming phone numbers or phone area codes, I do find this to be a very useful tool.
If you have any comments/questions regarding this blog entry, please don't hesitate to leave a comment in the comments section below. Please note that the comments are moderated and any comment containing a URL link (whether embedded or not) will automatically be flagged as spam and will not be posted.
I wrote about what I liked regarding my Blackberry Q10 in last week's blog entry and a few blog entries prior to that I wrote about what I disliked about my Blackberry Q10. Since I wrote about what I disliked regarding my LG Nexus-4, now is the time to write about what I like about my LG Nexus-4.
I've been using my LG Nexus-4 for about 4 months and I've used a few Android phones in the past, however, as mentioned in my previous blog entries, my LG Nexus-4 was purchased as being an upgrade for my Samsung Nexus-S so my impressions of the LG Nexus-4 (likes/dislikes stems from this fact).
Before I go ahead with this, as stated in one of my previous blog entries, I just wanted to state that I'm not an Android fanboy nor am I an Android hater. As you can see from some of my other reviews on cellphones, I have/use many different phones and find things that I like about each of them and things that I don't like about each of them.
The first thing that I like about the LG Nexus-4 is that it runs the stock Android version without any manufacturer bloatware/customization. This was one of the main reasons why I prefer the Nexus line of phones.
The second thing that I like about the LG Nexus-4 is that it comes factory unlocked. Regardless of which carrier you purchase the LG Nexus-4 from or whether you purchase it directly from the Google store or whether or not you received a subsidy when you purchased the phone from the carrier, it comes factory unlocked.
The third thing that I like about the LG Nexus-4 is that I find that it is fast. As mentioned, I purchased the LG Nexus-4 as an upgrade for my Samsung Nexus-S and the Samsung Nexus-S was starting to show its age by not being as responsive as necessary for a lot of the programs available for the AndroidOS.
The fourth thing that I like about the LG Nexus-4 is that it is pentaband 3G (850/900/1700/1900/2100) and quadband 2G (850/900/1800/1900). I use my phone both in the US and Canada. While in the US, I use T-Mobile and using my LG Nexus-4, I have no problems getting 3G. While in Canada with Rogers/Fido/Bell/Telus, I can get the same 3G signal with the phone.
The fifth thing that I like about my LG Nexus-4 is that so far I haven't experienced any memory issues with the phone when installing my Android applications on it. With my Samsung Nexus-S, I would receive error messages regarding there not being enough memory to install the programs that I wanted onto it (I have a lot of applications installed on my Nexus-S). On my LG Nexus-4, I've installed the same number of applications without experiencing any memory issues (for the time being).
The sixth thing that I like about the LG Nexus-4 is that it supports XBMC for Android and has no problems streaming the videos that I've selected.
The seventh thing that I like about the LG Nexus-4 is that like all Android phones that I've used, it supports Internet calling via SIP. You can also program the phone to use SIP as opposed to the regular cellular network if you are connected to a wireless access point.
The eighth thing that I like (but this is due to the OS version of Android on it) is the face unlock ability. However, I've had to disable this since in order to get my work e-mail on an Android phone (such as the LG Nexus-4), one of the security features required is the disabling of the camera for the purpose of unlocking the phone.
The ninth thing that I like about the LG Nexus-4 is that I've been able to install all the apps that I haven't run into insufficient space issues when installing Android apps on it. I've installed a lot of Android applications on my LG Nexus-4. Including the default Android applications, I have over 100 applications installed on my LG Nexus-4. With my Samsung Nexus-S, I ran into memory/space issues even after transferring the Android application to the internal USB storage data memory. Including the default Android applications, I have about 65 applications installed on my Samsung Nexus-S and ran into memory/space issues forcing me to transfer some of the applications onto the internal USB storage data memory.
If you have any comments/questions regarding this blog entry, please don't hesitate to leave a comment in the comments section below. Please note that the comments are moderated and any comment containing a URL link (whether embedded or not) will automatically be flagged as spam and will not be posted.
My blog will contain my thoughts/reviews on various subjects/topics including technological gadgets, electronic gadgets, computer gadgets, and software.
I might write about other things that come to mind but most of my posts will be related to the above.
I welcome comments (which are moderated before being posted) but comments with URL links will automatically be flagged as being spam and not posted.
As an Amazon Associate I earn from qualifying purchases.