Monday, August 19, 2013

Android Device Manager Review (Locate your Android Device)

Google recently introduced/incorporated an Android Device Manager on their Android devices. It is a fairly simplified application/setting which allows users the ability to locate their Android device(s) as well as protecting your personal information by offering users the ability to wipe the device remotely. Both of these features require that your device either be connected to a WiFi access point or for your device to have an active data connection/plan. Google made an announcement regarding this new feature on the following blog entry *HERE*.

To activate it on your Android device, you would click on the Google Settings Icon and then click on Android Device Manager. You must configure this on each of your Android devices since the setting is specific to the device itself. After doing this, you will then turn on the "Remotely location this device" and/or "Allow remote factory reset" depending on what you want to activate.
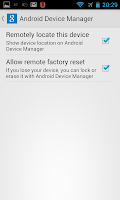


In order for the location to work, the phone must have data enabled or be connected to the wireless network. After you've activated Android Device Manager on your Android device, in order to test it or use it, what you will have to do is log onto your Google account and go to the following website: https://www.google.com/android/devicemanager

From the website, users can get an approximate location of where their Android device is as well as cause it to ring. The ring can be deactivated on the device itself by pushing the on/off button on your Android device so this feature is used mainly to find your device if you are in close proximity to it. For example, if you've misplaced your phone at home (or at work), instead of calling your phone (where your phone might be muted), you can log onto the above website on a computer and force your phone to ring. This will automatically unmute your phone, raise the volume to the maximum, and sound an alarm/ring. From the sound, depending on your proximity to your Android device, you should be able to locate your it. Left undisturbed, your phone or Android device will ring for approximately 5 minutes. As mentioned above, anyone can turn off the alarm by pushing the on/off button on your device.

During my testing, I have found that the Android Device Manager is sometimes problematic and sometimes it will work while other times it won't work. This is for both the ringing of the device and the locating of the device feature.

I have not tried using the "Erase Device" feature mainly because I didn't want the hassle of re-installing all my applications and re-configuring the device again. You can scroll through the Android devices which have been installed using your Google account.


The Android Device Manager website also allows users to rename their device in case they want to change the name that Google automatically used to identify the device. In the above screenshot, I renamed the name that Google gave for the Android installation on my HP Touchpad to "HP Touchpad" from the default name which I believe was a shortened form of Cyanogenmod with the version number.

Android Device Manager offers basic features for locating and protecting your Android device. Hopefully, Google adds more features to this. Even though Android Device Manager currently only offers basic features, I do find that the features are very good and have no issues recommending people to activate it on their Android device(s). It probably won't stop a thief from stealing your Android device but it might help you find your device from a thief depending on how fast you act and whether the thief has had a change to circumvent the Android Device Manager features. Since the features rely on an active data connection or your device being connected to a WiFi access point, a thief could easily circumvent the features by either turning off data or putting your Android device into Airplane Mode.

If you have any comments/questions regarding this blog entry, please don't hesitate to leave a comment in the comments section below. Please note that the comments are moderated and any comment containing a URL link (whether embedded or not) will automatically be flagged as spam and will not be posted.

Monday, August 12, 2013

Rooting Samsung Nexus-S

Since my Samsung Nexus-S was having issues updating existing programs that I installed onto it and I was mainly using my LG Nexus-4, I decided to root my Samsung Nexus-S after I purchased a replacement battery for it (because the original battery that I had would not last more than half a day based on very light usage). Another reason why I finally decide to re-root my Samsung Nexus-S was because there hasn't been an upgrade to OS for the Nexus-S in a long time (nor do I expect an upgrade to the OS). I had rooted it in the past but when I upgraded the OS software, it reverted to a non-rooted state and because I was only using two applications that required root access, I opted not to root it until recently. Every time the OS is officially upgraded, one of the steps involved in rooting the phone generally wipes the phone back to factory defaults. I found this to be time consuming (reconfiguring the phone and reinstalling all the applications that I had) and not worth it for the 2 applications that I use which require root access. Since there hasn't been an OS update for the Samsung Nexus-S in a long time and I recently replaced my Nexus-S battery, I felt now was a perfect time to root my Nexus-S again.

I did some research on rooting my Samsung Nexus-S and came across this video on YouTube showing how to root the Nexus-S. You can view the YouTube video below or by clicking *HERE* (I did not create this video). A shoutout goes to QBKing77 for creating this video and providing instructions/steps and shoutout also goes to the creator of the program WugFresh.

My instructions are based on the above video and things that I noticed when I tried to root my Samsung Nexus-S. Just like with my blog post on installing Android on the HP TouchPad, I am including my standard disclaimer.

My instructions are geared towards people who are somewhat familiar with computers and know how to troubleshoot simple installation issues or go into certain directories using the command prompt. Regardless of whether you are or aren't such a person, I am including the usual disclaimer that I am not responsible for anything that might go wrong when you follow my instructions or use my files. These instructions and files worked for me and they should work for you.


The instructions that I followed from the YouTube video mention downloading a file. I've included this file on my blog which you can download directly *HERE*. After watching the video to its entirety, download the file either from the site mentioned on the video (or in the description area of the video) or you can download it from the link on my blog.

Please note that everything will be wiped from your phone when you root your device (during the unlock process).

I won't detail everything that the video goes through but will write about some of the issues that I had.

The first issue was that I wasn't sure which version of the Nexus-S I had. In my case, I purchased my Nexus-S from a Canadian carrier called Fido which uses the same frequency/bands as Rogers Wireless in Canada and AT&T in the US. After doing some research (since I could not locate this information on my phone), the Samsung Nexus-S version that I had from the menu selection was the 850MHz i9020a version (which might be the information shown in Settings -> About Phone -> Baseband version).


In terms of which version of Android I was using, I got this information from Settings -> About Phone -> Android version.

From the program screen, I clicked on the "Full Driver Installation Guide" button and followed the instructions. During step 2 of the driver installation, I was presented with the screen/window below:


The recommended solution based on my set-up was Driver Solution #1 based on the screen. However, I tried using the recommended solution a few times (rebooting my computer multiple times and uninstalling/reinstalling the drivers) and the step would always fail during the the Fastboot Check (the ADB check worked without any issues). I decided to try using Driver Solution #2 and after rebooting my computer, both the ADB check and the Fastbook check worked without any issues.

I then proceeded to unlock the bootloader and didn't run into any issues.

When rooting my device using the "Root" button, at first I didn't select the "Custom Recovery" option but after running into a minor issue during boot-up, I redid the step using the Custom Recovery option. After completing all the steps when I clicked on the "Root" button, it didn't add "Superuser" or "SU" to my Samsung Nexus-S.

The video makes mention to the possibility of this happening. To fix this, you will need to download the SU application. I have a copy of it *HERE*. After downloading this ZIP file, you will place it on the root directory of your Samsung Nexus-S (which will probably place it into the /sdcard directory).

After doing this, you will remove your Samsung Nexus-S from your computer and turn off your Samsung Nexus-S, wait a few seconds and then on your Nexus-S push the power button and volume up button at the same time to get into the Boatloader screen. Use the volume key to select "Recovery Mode" which will bring you to the Team Win Recovery screen. Select "Install" and then locate the "CWM-SuperSU-v0.99.zip" program. CWM-SuperSU-v0,.99.zip will install. This is also shown in the video but I thought that I would make mention of it because it did apply in my situation.

If you have any comments/questions regarding this blog entry, please don't hesitate to leave a comment in the comments section below. Please note that the comments are moderated and any comment containing a URL link (whether embedded or not) will automatically be flagged as spam and will not be posted.

Monday, August 5, 2013

Blackberry Q10 Update (MR1)

Since I wrote about the update to my LG Nexus-4 last week and this week there was also an update for my Blackberry Q10, I thought that I would write about it.

The update was ~150 MB in size. I didn't note down how long it took to apply this update since I started the update and then watched television but I would say that it is not as fast was the update process on the LG Nexus-4.

Before the update, from the Settings menu on my Q10, in the About menu with the Category OS screen being: Software Release 10.1.0.273 & OS Version: 10.1.0.1720, I applied the update. After the update, on the same screen, the values were: Software Release 10.1.0.4181 & OS Version 10.1.0.4633.

The update and some of the improvements are shown on Blackberry's official blog *HERE*.

Some people reported that after applying the update, the lost their SMS messages. For me, I didn't experience any issues with the upgrade except for the following:

1) When my Blackberry Q10 rebooted, I was prompted to re-enter my Gmail accounts. My Gmail account is set for 2-step authentication/verification and because I didn't have the application password with me that I had used, I decided to try using my main password. To my pleasant surprise, after entering my main password, I was prompted for the passcode generated from my phone's Google Authenticator program. After entering the passcode generated from Google Authenticator, my Blackberry Q10, I received a screen informing me that my Blackberry Q10 was now configured to access my primary Google account.

2) I use an instant messaging application called WhatsApp on my Blackberry Q10 and after the upgrade, all the names vanished from my WhatsApp contacts. The only thing that I could see was the picture of the contact from WhatsApp which main sending a message to a particular person very difficult unless I recognized the picture that they used. However, after ~2 days, the WhatsApp application returned back to normal where the names appeared on my WhatsApp application again.

The Google contacts seems to synchronize a lot better than previously where it seemed to be doing it randomly. I updated information regarding one of the contacts that I saved on my computer and probably within 30 minutes (this is what it is set to on my Blackberry Q10), this information was on my Q10.

The only other noticeable change after the update is the Blackberry calender instead of being black is now white. Personally this doesn't bother me as I didn't have a preference to either colour for the calendar but some people might prefer the black calendar background. I also noticed that e-mail on the Blackberry Q10 can now be configured based on an unlimited time period instead of the previous maximum of 30 days.

Since I only applied the update about 2 days ago, I didn't have a lot of chance to experiment/test everything but for me, I haven't noticed any degradation in terms of speed or battery life

If you have any comments/questions regarding this blog entry, please don't hesitate to leave a comment in the comments section below. Please note that the comments are moderated and any comment containing a URL link (whether embedded or not) will automatically be flagged as spam and will not be posted.